Friday, May 11, 2012

Wants to Reset the Windows Live Mail Password? Here is the Solution


Windows Live ID is one of the recently known names of Microsoft Account. It is the access control on web services which is developed and provided by Microsoft. It allows one to access many websites simultaneously by using only one account. This type of service is favourably known as “MSN”.

The Windows Live Account is the website which is used to manage the identity and relationship of Microsoft account users with Windows Live.
The Features that are to be included in Windows Live account are:
  • One can change or reset the user password.
  • Being able to link multiple Windows Live IDs.
  • One can update the user information, user settings and also close the account.
Occasionally, If you wants to reset the password for your Windows Live ID or when you have forgotten the password.
So, Here the following steps that you need to follow for reset password:-

  1. Go to the Windows Live Reset your Password Webpage and then select the option “I forgot my password”.
  2. Now Click on Reset your password option.
  3. Here enter your Windows Live ID, along with that type the characters that appears in the Picture box, and then click on Continue.
  1. Likewise on Reset your password page, Choose one of these four ways to reset your password:- Email me a reset link, Send a code to my mobile phone, Use my trusted PC, or Customer Support.
  2. Hence, follow the steps thoroughly to reset the password completely.
  3. Now, your password would be successfully Reset and when you see the following message: You have changed your password.
  4. So, Click the Sign in to Windows Live button to get return to your Windows Live account.

In a Brief:- Always choose a password which is easy to remember by you and it wouldn't be a cumbersome which might led you to forget frequently. Suppose, if in case you lost your password which was set to Windows Live mail account that would become inaccessible to you. Hence, for that Mail Password Recovery Software is recommended to retrieve an access to that account along with the credential data stored into it.

Tuesday, May 8, 2012

How to Encrypt or Decrypt a File or Folder in Windows 7


Encryption is a technique to gain the security of a file and folder by just scrambling the content of it. It could only be read by someone who has an accurate encryption key to unscramble it. Say, for example If you need get something on the Internet, the information required for the transaction (like address, contact number, and credit card number) is usually get encrypted to keep it safe in all respect. Always Use encryption technique when you want a strong protection for your information, where as Decryption is just the opposite of Encryption, which allows removing protection from the files and converting it back again into original plaintext.

So, Encrypting folders and files is one of the best way to protect them from unauthorized access. Encrypting File System is a characteristic of Windows that allows one to store information into your hard disk in an encrypted format way. The Encryption is one of the strongest protection technique that Windows provides to make your data secured.

Here are few steps to encrypt or decrypt a files/folders in Windows 7 :-

To encrypt a folder or file

  1. Firstly, Right-click the file/folder which you want to encrypt and then Select Properties.
  1. Now, Click on General tab and then Click Advanced option.
  1. Here, Select the Encrypt contents to make it secure data check box, and then click OK.

To decrypt a folder or file

  1. Firstly, Right-click the file/folder which you want to decrypt and then Select Properties.
  2. Now, Click on General tab and then Click Advanced option.
  3. Here, Select the Encrypt contents to make it secure data check box, and then click OK.

So, These are the few steps that you need to follow to encrypt or decrypt the files or folders of Windows 7. And Never led your create a password which is difficult to remember by you because if in case you forget it the password then that files/ folders will become inaccessible to you. So, in that situation Windows Password Recovery software is highly recommendable.

Monday, May 7, 2012

Best Way to Remove Password from MS-PowerPoint 2007


PowerPoint is one the most commonly used software for making visual aids for presentations. MS-Office PowerPoint 2007 is a presentation program which comes a part of product in complete suite of MS-Office 2007. The software is highly compatible with both PC's and Mac OS X platforms.

MS-PowerPoint 2007 is one of the industry standard programs for students, educators and business professionals for creating presentations. PowerPoint also allows password protections who are needed to protect critical information contained in the presentation.


PowerPoint also allows password protection in order to ensure only those that are invited or intended to view the presentation. If you are not interested to have your presentation password is being protected, then you can remove it safely.

Few steps to remove password from MS-PowerPoint is given below:-
  • Firstly, you need to Click the "Microsoft Office" button from the top menu, Select the file of your choice and then click "Open".
  • Secondly, Click the "Microsoft Office" button, then Click "Prepare" and again Click "Encrypt Document."
  • Thirdly, now you need to Highlight the password in the "Password" field in the "Encrypt Document" box and then click on the "Delete" button. And Finally, Click the "Save" button to save the document.

So, These are the three steps that you need to follow to change the password of MS-PowerPoint. Never create a password which is difficult to remember because if in case you forget the password then PPT's will become inaccessible to you. So, in that situation you can use PowerPoint Password Recovery software which recovers the lost password of PPT files.

Wednesday, May 2, 2012

How to configure Pidgin to work with G-Talk


As you all know, Pidgin (formaly known as “Gaim”) is one of the open-source Instant Messaging Client Application based on libray knownas “libpurple” which has now added a new Google Talk protocol which can be used to configure your Google Talk Id. Pidgin consists of many features which include some of the standard tools for an instant-messaging client, such as a contact list, conversation and chat logging and file transfer on supported protocols. The Tabbed conversations is one of the optional feature on Pidgin.


The Instant Messenger window consists of the message window, formatting tools, and an edit box into it. And It can be used to chat using MSN, Yahoo, AIM, Google Talk and many other protocols.
Whereas G-Talk is a free service provided from Google that allows any of the users to make voice calls, to send and receive of instant messages and file transfer. But G-Talk requires users to have a Google/Gmail account to use the client.

Important Steps : How to configure Pidgin to work with G-Talk

  1. Either Download or Install the latest version of Pidgin on Kubuntu / Ubuntu and you can just type “aptitude install pidgin” in terminal to install the Pidgin.
  2. Now, Open Pidgin and Go to Accounts > Manage Accounts > Add window of Pidgin.
  3. From that available drop-down box, And Choose G-Talk as the Protocol.
  4. Now, For that Screen name enter your Google-Id (Gmail ID) just enter the user name without @gmail.com in it. And In the Password field just enter your Google ID password.


Now, you can do start chatting with your G-Talk friends using Pidgin software while keeping in touch with users of other IM users also. So, In this No need to install G-Talk Software. And always use that password which is easy to remember, If somehow not able to remember that then you need to recover the password by using IM Password Recovery Software which allows an access to your account which is highly reliable and more efficient.


Tuesday, May 1, 2012

How to change Password of RAR Archive


Very few people know that RAR stands for Roshal Archive. A RAR archive is that type of archive file format that supports into error recovery, data compression and file spanning. The file name extension used by RAR is .rar for data volume set and .rev for recovery volume set. RAR files may be created only with commercial software WinRAR which is available for Microsoft Windows.

RAR file contains the multiple other computer files which all are compressed down into one file called WinRAR. WinRAR does not give an option to users for changing a password once one has already been applied to a RAR archive. Although creating a new archive seems to look easy in just few simple steps with different password.

So, Here are few steps on how to change the password of RAR Archive:-

  • Firstly, Right click on the RAR file and with the password you want to change. From that menu which appears, choose the option that reads "Extract All."

  • Now, you Enter the RAR file's password into the dialog box, Once finished press the "OK" button.

  • Once pressing the "OK" button from the window that appears. That just tells the WinRAR that you want to extract the contents of the archive to a folder located in the same directory. The folder will contain the same name as the archive.

  • So, Right Click on the newly created folder and select "Add to Archive". This will bring up a dialog box featuring settings dealing with the archive.

  • Then, Click on the Tab that says "Advanced". And again click on the "Set Password" button and here, you need to type a password into the box.

  • Then, Click on "OK" button. This will allow you to add the contents of the folder to an archive of the same name. The newly created archive would be the same to your original RAR file.

In a Nutshell - Always make an effort to use or create a strong password so that you can remember it easily, but if somehow you lost your password then MS-Access file will be inaccessible for you. And in that situation you might get perplexed, Perhaps there is nothing like to get hassle as it’s not a big deal but in that situation you need to use RAR Password Recovery to regain an access of the lost password.


Friday, April 27, 2012

How to Set Password for MS-PowerPoint Presentations


Microsoft PowerPoint is one of the presentation software program which is a part of the Microsoft Office suite. The current versions of Microsoft Office Powerpoint are Microsoft Office PowerPoint 2010 for Windows and Microsoft Office PowerPoint 2011 for Mac. PowerPoint allows everyone for graphical approach for presentations in the form of Slide that accompany the oral delivery of the topic. This program is widely used in Business and Classrooms and is a very effective tool when it is used for training purposes.

MS-PowerPoint is one of the very simplest program to learn. It is one of the No. 1 program used worldwide for presentations purposes. Anyone can create that Impressive presentations that look like as if they were designed by a professionals. See when you create Powerpoint presentations and if they use a shared computer you may want to consider password protecting them so that no one else can make any changes into it.

So, Few Steps are given below, How to do it:-

  • So, Start Microsoft PowerPoint 2007, and open that presentation which you want to be password protected.
  • Now, Click the Office button which will appear at the top left corner of the PowerPoint screen and choose “Save As” option. A dialog box will be displayed.
  • Then, Click the "Tools" button at the lower left corner of the dialog box and Select "General Options". Another dialog box will be displayed.
  • Here, Key a password into the "Password to open" text box. Another option is to key a password into the "Password to modify" text box. This command always requires a password before a user can save any changes to the presentation. You can also set a password for both of these or just one option. Your password should contain at least 8 characters, including numbers, letters and symbols.
  • Choose the "OK" button to close the "General Options" dialog box and return to the "Save As" dialog box.
  • Now in the "Save As" dialog box click the “Save” button to set the password to the Powerpoint presentation. And Close the dialog box.

So, These are the few steps to set password for MS-PowerPoint presentations which you can use it in order to make your PPT file protected. Never create a password which is difficult to remember and if you don't know the password the PPT files will become in accessible to you. So, In that situation PowerPoint Password Recovery Software can be used to recover lost password.

Thursday, April 26, 2012

How to Set Password to Modify a Document in Word 2007


MS-WORD is one of the part of the bigger package called MS-OFFICE, which could be done in much more than Word processing. Even, when you open up MS-OFFICE you will find four main components in it i.e. MS-WORD for word processing, MS-EXCEL for spread sheet, MS- ACCESS for database management and MS-POWERPOINT for presentation purposes.

In Microsoft Office 2007, you can use passwords to help and prevent other people from opening or modifying the Microsoft Office Word 2007 documents. This only is allowed to authorize reviewers to modify the content.

So, below are the few steps you need to follow :-

  • Click the Microsoft Office Button>Click Save As> Click on Tools option>Click General Options.
  • Now, you need to type a password in the Password to open box, if you want reviewers to enter a password before they can view the document.
  • Type a password in the Password to modify box, and if you want reviewers to enter a password before they save changes to the document.
  • Select the Read-only recommended Check Box, if you don't want content reviewers to accidentally modify the file.
  • Again, Click on OK button.
  • So, Now you need to Retype your passwords when prompts to confirm them and then click OK.
  • So, Click Save in the Save As dialog box.
  • And, you can Click Yes, if prompted to replace the existing document.

So, these are the few steps to set a password in order to modify a document and you can use it to protect the files. Never try to create a complicated password which is hard to remember because it sometimes becomes difficult to remember and at last it happens files will become inaccessible to you. So, if in some situation if you don't know the correct password can use the Word Password Recovery Software which is immensely used for recovering the lost passwords of word files.


Sunday, April 22, 2012

How to set Password on Excel documents


As you all know Microsoft Excel is one of the Spreadsheet application which is being written by Microsoft for Microsoft Windows and Mac OS X. It includes various features into it like Calculation, Pivot Tables, Graphing Tools and it is also used for Macro programming language called Visual Basic for Applications. Excel forms are one of the part of Microsoft Office.

Oftenly, users who create Microsoft Excel documents and they wish to keep data confidential or they wants to be only viewed by people whom they wish to enable a Microsoft Excel password on the file to help protect the contents of the file.

Below are the Steps, which is required for creating a Microsoft Excel document with a password.

  • First, open the Excel workbook file .
  • Go to File and Save as option.
  • Then a small window will open, click on Tools option.
  • Then from that option select General options.
  • A small window appear named Save Options.
  • Then enter an area in Password to open field and Click OK.

  • Then, A Confirm Password screen will appear. Here, Type the password again in Reenter password to proceed area option, then click OK.


  • Now, The Password has been set to Excel Workbook. Then Next time someone tries to open the Excel workbook they get this prompt.

  • If the password was set for Password to Modify Option, In addition to Password to open, you will also see the following prompt to Enter password for write access or read only.
  • Enter the 'modify' password in Password area, then Click OK.


So, these are the Two types of passwords -password to open and password to modify which you can use to make your Excel document file protected. You should always make a habit of using or creating a strong password which you can easily remember because if you loss password then Excel file will become inaccessible for you. In that case you need to use Excel Password Recovery software to regain access of your valuable and critical file.

Wednesday, April 18, 2012

Best Way to Change Yahoo! Mail Password


Yahoo! Mail is one of the well rounded free email services that is offered by the American search engine company Yahoo!. It was the second largest web-based email service with 310 million users as of October 2011, and the most popular webmail service in the United States and it is widely used in Internet. Yahoo! Mail is the omnipresent email program on the web and mobile devices with unlimited storage, Social Networking and Instant Messaging to boot.

Oftenly, it's become very common many people forget there Yahoo! Mail password, but how to change yahoo password is always anguished about by many people. So, there are few methods on how to change yahoo password.
So, Here are few Steps on How to change yahoo password when you forget your yahoo password:-

1. Firstly get Login to your Yahoo! Mail account.


2. Then, Click your name (say for example, Andrew) , Andrew greeting will appear at the top-left of the page. From that, then Select Account Information. A New browser screen will appear ask you for verifying the password.
 
 
3. Type password into the TextBox and then Click Sign In option. The Account Information page will get appears. 


4. Now, From the Account Information menu, Select Change Password Option.

5. Type your Current Password in the first TextBox.

6. Type your
New Password in the second TextBox.

7. Then, Confirm your
New Password by typing it again in the third TextBox.

8. Then Click on Save button. Hence,
Changing yahoo password is successful.

Hence, Yahoo! Mail password always applied to entire yahoo account which is not only valid to yahoo mail account but also for other personalised services of Yahoo! Includes:-
    • Yahoo! Messenger
    • Yahoo! Chat
    • My Yahoo!
    • Yahoo! Finance
    • Yahoo! Music Engine, etc.

Note:- you should always make a susceptibility to create a strong password which you can easily remember, But in some situations if you still feels like having difficulty in logging to your account then in that case you may have to compromise and generate a request for new password to Yahoo!

Wednesday, April 11, 2012

How to Set and Remove a BIOS Password in Windows


A BIOS password is one of the important protection measures that could be used to make someone stop powering up a computer system or making changes into that which is one of the most sensitive areas. Many branded computer manufacturers like Dell, IBM, HP etc. lock their customers out of this particular area because they don’t want to their customer should change anything and potentially damage the machine for which they provide for warranty. Perhaps, when someone likes a computer technicians or hardware enthusiasts, sometimes they need to make some hardware changes to the computer so that they can access the BIOS. So, BIOS is the first program before starting up your system even before the operating system is booted.

Some steps to set a BIOS password:-

Step 1: As you start your PC press 'Del' or ‘Esc’ buttons continuously and then you’ll find the BIOS screen in your system.

Step 2: When the BIOS screen will be displayed, go to the Security Option, in that you will find two more options for setting a password.
  • Admin Password– You cannot delete this password in BIOS without knowing the password; this is only meant only for advanced users.

  • User Password – You can delete this password from BIOS even if you don’t know the password.
Step 3: To set the Admin Password write the password in the space provided confirm the password then save it and exit.
Step 4: To set the User Password either provide the old password if it is enabled or write the new password in the space provided confirm and save it then exit and your password is saves now no one can start your PC without the password.

Some Methods to Remove a BIOS Password:

1) Removing a BIOS Password by using a CMOS Battery

This is one of the simplest method to remove a BIOS password by simply removing the CMOS battery. A computer always remember its settings and keep the time even when it is turned off or unplugged because these parts are powered by a small battery inside the computer called a CMOS battery. If you take out that battery, the computer will forget a lot of its hardware settings, including its BIOS password. This technique should not be performed on Laptops if you are not an experienced in working with laptop hardware.
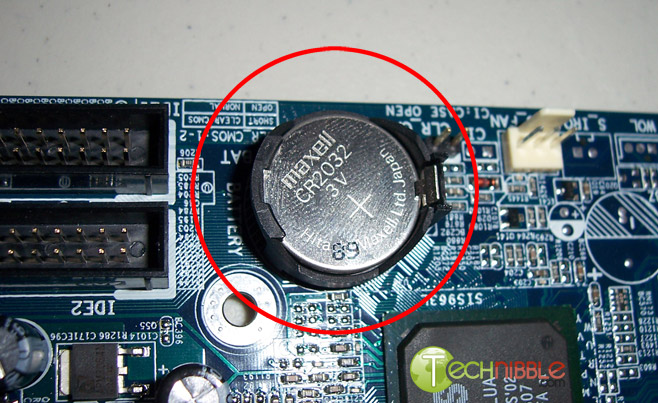
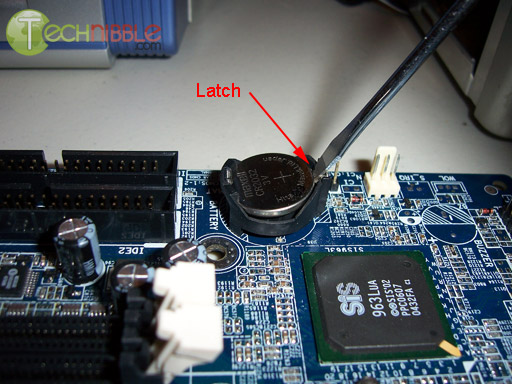
But Anyway, Now open up the computer case use a screw driver to locate the flat, circular and metallic CMOS battery. 
 Once you have located it, now you can observe how the latches are holding it.
 

Make sure to power off the computer, unplug the power cables and unplug any USB devices if they are powered. The computer must not be able to get power from anywhere for this to work. Take out the CMOS battery and wait for 10 – 25 minutes before putting it back into its original place. The main reason for waiting few minutes is that the computer still store power in its capacitors even though everything is unplugged. The waiting period allows enough time to get discharge.
Plug everything back in, powerup the computer and enter the BIOS again. If everything goes well there should be no more password left. But, In some cases If you get an uncanny error messages during boot up now, then you will need to go to “Load BIOS Defaults” in BIOS and save the changes to fix them.
If this method doesn't work out, try another method.
2) Removing a BIOS Password by using the manufacturer backdoor password:-
On many of the computers (especially old ones), computer manufacturers build the backdoor passwords for their own technicians so that they can access the BIOS when the hardware is being serviced. Here are some of the ones that have been reported till now. So, you can now try a quite few passwords before you find one that really works out.
* Remember-These passwords are Case Sensitive.
AMI BIOS Backdoor Passwords:
  • A.M.I.
  • AAAMMMII
  • AMI
  • AMI?SW
  • AMI_SW
  • BIOS
  • CONDO
  • HEWITT RAND
  • LKWPETER
  • MI
  • Oder
  • PASSWORD
Award BIOS Backdoor Passwords:
  • (eight spaces)
  • 01322222
  • 589589
  • 589721
  • 595595
  • 598598
  • ALFAROME
  • ALLY
  • ALLy
  • aLLY
  • aLLy
  • aPAf
  • award
  • AWARD PW
  • AWARD SW
  • AWARD?SW
  • AWARD_PW
  • AWARD_SW
  • AWKWARD
  • awkward
  • IOSTAR
  • CONCAT
  • CONDO
  • Condo
  • condo
  • d8on
  • djonet
  • HLT
  • J256
  • J262
  • j262
  • j322
  • j332
  • J64
  • KDD
  • LKWPETER
  • Lkwpeter
  • PINT
  • pint
  • SER
  • SKY_FOXSYXZ
  • SKY_FOX
  • syxz
  • SYXZ
  • TTPTHA
  • ZAAAADA
  • ZAAADA
  • ZBAAACA
  • ZJAAADC
Russian Award BIOS Passwords:
  • %øåñòü ïpîáåëîâ%
  • %äåâÿòü ïpîáåëîâ%
Phoenix Backdoor BIOS Passwords:
  • BIOS
  • CMOS
  • phoenix
  • PHOENIX
Other Manufacturers Backdoor Passwords: (manufacturer name – password)
  • VOBIS and IBM – merlin
  • Dell – Dell
  • Biostar – Biostar
  • Compaq – Compaq
  • Enox – xo11nE
  • Epox – central
  • Freetech – Posterie
  • IWill – iwill
  • Jetway – spooml
  • Packard Bell – bell9
  • QDI – QDI
  • Siemens – SKY_FOX
  • SOYO – SY_MB
  • TMC – BIGO
  • Toshiba – Toshiba